
420a turbo build / What do I need? -- WRITTEN BY PWEE05
I want to start by saying building an engine is almost like ordering a hamburger. Everyone likes something different and your build should reflect that. If you do decide to build you have complete freedom to build EXACTLY what YOU want.
(excluding California R.I.P.)
The 420a (A588) engine is a Chrysler made engine. Good news: Chrysler has been turbo charging cars for over 20 years. Unbelievably started from the K-car platform, don’t laugh, http://www.allpar.com/eek/k/k.html and there is a video floating around of a Dodge Caravan AWD destroying a Camaro SS at the track running a 12.96! Definitely one of the funniest, and most shocking things I’ve ever seen (Soccer Mom meets V8 racer AND WINS!!!). So don’t worry we can make your 420 scream. Bad news: besides oil leaks, you have to spend some money.
The eclipse 420a is very similar and is in some dodge models of the same years with only slight differences. The head is reversed (compared to neons), but building internally will be the same and you can even search for neon, avenger, or sebring parts if you can’t find any for an n/t eclipse. Never hurts to cheat, but make sure they are correct before purchasing.
There is a long list of what you will need for more power but don’t fear, you can turbo a stock 420 car, do so cautiously (I will get into that later). If you look at the below pictures you can clearly see a difference between the connecting rods. The picture to the left is a piston and rod assembly for a stock 420 engine. The other is an aftermarket Eagle made rod which can support over 300hp. The stock rods, obviously, can not take much of a beating and must be replaced if you want higher hp numbers.
[attachment=3966:stock_pi..._and_rod.jpg] [attachment=3967:h_beam_rods.jpg] [attachment=3968 iston.jpg] [attachment=3969:high_comp_piston.jpg]
If you take a look at the first piston picture you can see that it has a “dish” in it. This is to reduce compression. The second is a high compression piston for a different engine that is only here to give a comparison. The stock 420 engine has a compression ratio of 9.6:1. A stock turbo car will be somewhere around 8.3/8.5:1 compression. Under boost periods cylinder pressures will increase because you are forcing air and fuel into the cylinder, thus the need for pistons providing a lower beginning compression ratio. Stronger metal composition doesn’t hurt either.
With turbo applications you do not necessarily need an intercooler if you are scrounging for money. HOWEVER, without an intercooler you MUST keep the mixture rich and low boost to keep from predetonation. THIS WILL DESTROY YOUR ENGINE!!!!!! It's a hard thing to avoid without an intercooler so lets just say, you need one.
Another thing that some shops do with turbo builds is allow a little bit more space between the piston and the cylinder wall than is normal. This will let the piston safely expand under boost periods, caused by increased heat. I am mentioning this because sometimes you can hear the piston “slap” against the cylinder walls and it may be interpreted as something else.
On to a list of things you should do to build your 420 for pressure. This does not include machining of the block/head and/or labor:
Stronger connecting rods------------------------Air fuel controller (AFC) or some other type of tuning device
Stronger pistons and rings-----------------------Larger fuel injectors
Metal head gasket---------------------------------Larger fuel pump
ARP head studs can’t hurt------------------------High flow exhaust
- (for a lower hp build you can use bolts)-------Fuel management unit (FMU) a 1:1 fuel pressure regulator is best(AFPR)
Turbo charger--------------------------------------Turbo manifold to fit your turbo
Oil lines---------------------------------------------Coolant lines depending on your turbo
Down pipe or O2 housing-------------------------Wastegate if not internal
Blow off valve (BOV)------------------------------Boost gauge
Boost controller------------------------------------MAP sensor check valve (missing link)
(if higher boost is desired)
new rod and main bearings
Suggestions
Upgraded ignition system-------------------------Vacuum line
Light weight crank pulley-------------------------Copper 110 exhaust gaskets
new oil pump--------------------------------------new O2 sensors
turbo timer ----------------------------------------new water pump
timing belt, pulleys, tensioner--------------------new seals
Intercooler-----------------------------------------Charge pipes
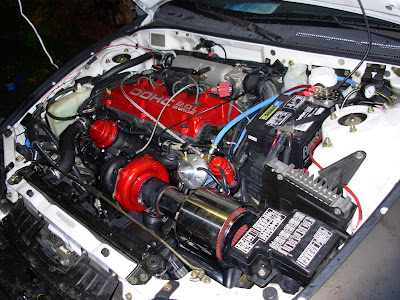
To give a comparison this is what I have in my engine.
JE 8.6:1 pistons and rings-------------------Eagle Rods
Clevitte main and rod bearings-------------ARP main studs
ARP head bolts-------------------------------Felpro head gasket and seals
Melling oil pump------------------------------Stage V port and polish
crane stainless valve springs----------------Crane titanium retainers
Accel 30lb/hour fuel injectors----------------Prothane engine and trans mount bushings
Walbro 255lph fuel pump---------------------FMU
Apexi AFCII-----------------------------------Screaming deamin coil pack
Crane firewire spark plug wires------------Ac delco double platinum spark plugs
ported stock intake manifold------------------------Treadstone cast turbo manifold
Knock off BOV----------------------------------XO2 22x12x3 bar and plate intercooler
Missing link MAP-----------------------------AEM UEGO wideband
Crane camshafts - Intake Duration 250@006 Lift .374 inch, Exhaust Duration 250@006 Lift .374 inch
Removed air conditioning & power steering (by choice, not necessary)
Garrett t3 super 60 (35lb/min) turbo (fast spooler)
My own welded and fabbed charge pipes using stainless exhaust pipe
And of course I replaced all of the preventive things I mentioned earlier.
I built this way because I like the sound of a very rough, loping idle and using the very efficient eclipse suspension for tearing up turns. I wanted a turbo that would spool quickly out of turns and power to fly away down straight aways. I will, for now, not be going over 250whp.
Now, I promised you I would get into turbo charging a stock 420. This is treading thin ice but you can do it. Low pressures and low volume turbos are key. You still need to upgrade your fuel and exhaust system:
Fuel pump-----------------------------Injectors
AFC------------------------------------FMU
Missing link----------------------------High flow exhaust
BOV------------------------------------Wastegate if not internal
Manifold--------------------------------Turbo
O2 housing and/or downpipe---------Boost controller
Charge pipe----------------------------Oil and possibly coolant lines
The turbo can be 14b, t25, SMALL 16g, gt 28 will work fine but please keep the boost under 8psi. You can’t get over 225whp (guesstimate) for very long on a stock engine without a big BOOM. This gets back to the weak rods and compression set up for an engine supposed to only see natural aspiration.
Always watch your exhaust gas temps (EGT’s) and if you have the luxury of a 4-lead O2 sensor keep an eye on that too. If it reads below .92 volts you are getting too lean. A dyno and an AEM UEGO Wideband O2 is the best way to tune, but you can do it with a long stretch of highway, a heavy foot and voltmeter. WATCH FOR COPS!!!
If you are wondering about costs, this could take all day because of the variety of places offering parts and services. Let’s just say that the total amount I have in the engine and turbo set up I could buy a small island. (around $5k but you can get away with around $2500.00 if you stay stock) If you ask me, “was worth it?” I would tell you definitely.
To touch briefly on bolt-ons, if you buy out the entire stock of all bolt-ons available for this engine you will only increase to “a noticeable difference.” It is a good place to start learning though.
The sky is the limit but make sure you know what you are doing, and if you don’t just ask for help like I did. Slowboy racing put my bottom end together, ported and polished my head and has taught me so much, but I still don’t know everything. Everyone has to start somewhere and if I missed something please don’t hesitate to correct.
--The above article was written by pwee05
I want to start by saying building an engine is almost like ordering a hamburger. Everyone likes something different and your build should reflect that. If you do decide to build you have complete freedom to build EXACTLY what YOU want.
(excluding California R.I.P.)
The 420a (A588) engine is a Chrysler made engine. Good news: Chrysler has been turbo charging cars for over 20 years. Unbelievably started from the K-car platform, don’t laugh, http://www.allpar.com/eek/k/k.html and there is a video floating around of a Dodge Caravan AWD destroying a Camaro SS at the track running a 12.96! Definitely one of the funniest, and most shocking things I’ve ever seen (Soccer Mom meets V8 racer AND WINS!!!). So don’t worry we can make your 420 scream. Bad news: besides oil leaks, you have to spend some money.
The eclipse 420a is very similar and is in some dodge models of the same years with only slight differences. The head is reversed (compared to neons), but building internally will be the same and you can even search for neon, avenger, or sebring parts if you can’t find any for an n/t eclipse. Never hurts to cheat, but make sure they are correct before purchasing.
There is a long list of what you will need for more power but don’t fear, you can turbo a stock 420 car, do so cautiously (I will get into that later). If you look at the below pictures you can clearly see a difference between the connecting rods. The picture to the left is a piston and rod assembly for a stock 420 engine. The other is an aftermarket Eagle made rod which can support over 300hp. The stock rods, obviously, can not take much of a beating and must be replaced if you want higher hp numbers.
[attachment=3966:stock_pi..._and_rod.jpg] [attachment=3967:h_beam_rods.jpg] [attachment=3968
iston.jpg] [attachment=3969:high_comp_piston.jpg]If you take a look at the first piston picture you can see that it has a “dish” in it. This is to reduce compression. The second is a high compression piston for a different engine that is only here to give a comparison. The stock 420 engine has a compression ratio of 9.6:1. A stock turbo car will be somewhere around 8.3/8.5:1 compression. Under boost periods cylinder pressures will increase because you are forcing air and fuel into the cylinder, thus the need for pistons providing a lower beginning compression ratio. Stronger metal composition doesn’t hurt either.
With turbo applications you do not necessarily need an intercooler if you are scrounging for money. HOWEVER, without an intercooler you MUST keep the mixture rich and low boost to keep from predetonation. THIS WILL DESTROY YOUR ENGINE!!!!!! It's a hard thing to avoid without an intercooler so lets just say, you need one.
Another thing that some shops do with turbo builds is allow a little bit more space between the piston and the cylinder wall than is normal. This will let the piston safely expand under boost periods, caused by increased heat. I am mentioning this because sometimes you can hear the piston “slap” against the cylinder walls and it may be interpreted as something else.
On to a list of things you should do to build your 420 for pressure. This does not include machining of the block/head and/or labor:
Stronger connecting rods------------------------Air fuel controller (AFC) or some other type of tuning device
Stronger pistons and rings-----------------------Larger fuel injectors
Metal head gasket---------------------------------Larger fuel pump
ARP head studs can’t hurt------------------------High flow exhaust
- (for a lower hp build you can use bolts)-------Fuel management unit (FMU) a 1:1 fuel pressure regulator is best(AFPR)
Turbo charger--------------------------------------Turbo manifold to fit your turbo
Oil lines---------------------------------------------Coolant lines depending on your turbo
Down pipe or O2 housing-------------------------Wastegate if not internal
Blow off valve (BOV)------------------------------Boost gauge
Boost controller------------------------------------MAP sensor check valve (missing link)
(if higher boost is desired)
new rod and main bearings
Suggestions
Upgraded ignition system-------------------------Vacuum line
Light weight crank pulley-------------------------Copper 110 exhaust gaskets
new oil pump--------------------------------------new O2 sensors
turbo timer ----------------------------------------new water pump
timing belt, pulleys, tensioner--------------------new seals
Intercooler-----------------------------------------Charge pipes
To give a comparison this is what I have in my engine.
JE 8.6:1 pistons and rings-------------------Eagle Rods
Clevitte main and rod bearings-------------ARP main studs
ARP head bolts-------------------------------Felpro head gasket and seals
Melling oil pump------------------------------Stage V port and polish
crane stainless valve springs----------------Crane titanium retainers
Accel 30lb/hour fuel injectors----------------Prothane engine and trans mount bushings
Walbro 255lph fuel pump---------------------FMU
Apexi AFCII-----------------------------------Screaming deamin coil pack
Crane firewire spark plug wires------------Ac delco double platinum spark plugs
ported stock intake manifold------------------------Treadstone cast turbo manifold
Knock off BOV----------------------------------XO2 22x12x3 bar and plate intercooler
Missing link MAP-----------------------------AEM UEGO wideband
Crane camshafts - Intake Duration 250@006 Lift .374 inch, Exhaust Duration 250@006 Lift .374 inch
Removed air conditioning & power steering (by choice, not necessary)
Garrett t3 super 60 (35lb/min) turbo (fast spooler)
My own welded and fabbed charge pipes using stainless exhaust pipe
And of course I replaced all of the preventive things I mentioned earlier.
I built this way because I like the sound of a very rough, loping idle and using the very efficient eclipse suspension for tearing up turns. I wanted a turbo that would spool quickly out of turns and power to fly away down straight aways. I will, for now, not be going over 250whp.
Now, I promised you I would get into turbo charging a stock 420. This is treading thin ice but you can do it. Low pressures and low volume turbos are key. You still need to upgrade your fuel and exhaust system:
Fuel pump-----------------------------Injectors
AFC------------------------------------FMU
Missing link----------------------------High flow exhaust
BOV------------------------------------Wastegate if not internal
Manifold--------------------------------Turbo
O2 housing and/or downpipe---------Boost controller
Charge pipe----------------------------Oil and possibly coolant lines
The turbo can be 14b, t25, SMALL 16g, gt 28 will work fine but please keep the boost under 8psi. You can’t get over 225whp (guesstimate) for very long on a stock engine without a big BOOM. This gets back to the weak rods and compression set up for an engine supposed to only see natural aspiration.
Always watch your exhaust gas temps (EGT’s) and if you have the luxury of a 4-lead O2 sensor keep an eye on that too. If it reads below .92 volts you are getting too lean. A dyno and an AEM UEGO Wideband O2 is the best way to tune, but you can do it with a long stretch of highway, a heavy foot and voltmeter. WATCH FOR COPS!!!
If you are wondering about costs, this could take all day because of the variety of places offering parts and services. Let’s just say that the total amount I have in the engine and turbo set up I could buy a small island. (around $5k but you can get away with around $2500.00 if you stay stock) If you ask me, “was worth it?” I would tell you definitely.
To touch briefly on bolt-ons, if you buy out the entire stock of all bolt-ons available for this engine you will only increase to “a noticeable difference.” It is a good place to start learning though.
The sky is the limit but make sure you know what you are doing, and if you don’t just ask for help like I did. Slowboy racing put my bottom end together, ported and polished my head and has taught me so much, but I still don’t know everything. Everyone has to start somewhere and if I missed something please don’t hesitate to correct.
--The above article was written by pwee05